The By-the-Numbers Reality of Home Brewing
| Metric | Store-Bought | Home-Brewed |
|---|---|---|
| Cost per 16oz bottle | $4.50 - $5.99 | $0.38 - $0.55 |
| Sugar content (typical) | 8-12g per serving | You control every gram |
| Probiotic CFUs | Often pasteurized and killed | Live, billions per sip |
| Flavor variations possible | 6-10 on the shelf | Literally unlimited |
| Annual savings (1 bottle/day) | - | ~$1,500+ in your pocket |
Reviewed by the BrewCrock Editorial Team
Last Updated: June 2026 | Written by The BrewCrock Editorial Team | Reading Time: 12 minutes
> The 30-Second Answer: Steep sweet black tea, cool it completely, drop in a SCOBY with a full cup of starter liquid, cover with a tight-woven breathable cloth, and let it work its magic for 7 to 14 days at 75-85°F. That's the entire skeleton. Everything else, the jar choice, the tea blend, the second fermentation, the temperature stability, is what separates flat sour vinegar from a crisp, gently fizzy elixir you actually crave pouring over ice on a hot afternoon.
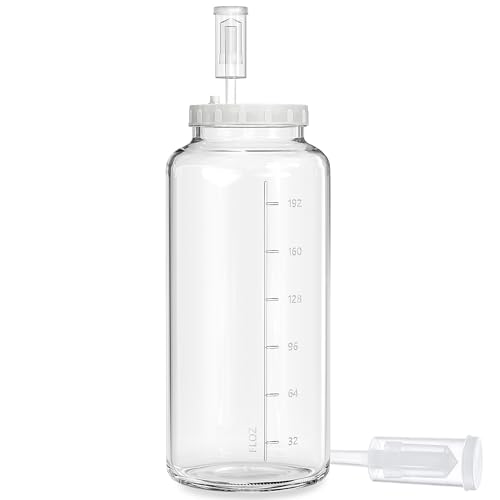
- With 4.3” Wide Opening And Scale Mark: The wine-making kit has a 4.3” wide opening, is easily put in your pickled food and cleaned it by hand effortlessly. In addition, this
- 100% Sealing Screw On lid: The sealing lid with a gasket and a hole plug ensures optimal tightness and functionality. The hole plug design even facilitates fermentation with an
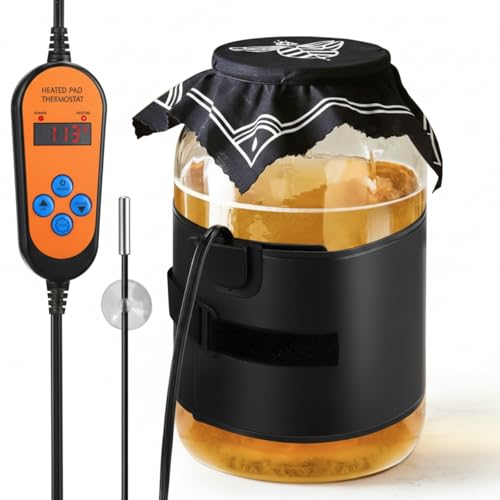
- 【Accurate Temperature Control】the kombucha heating wrap has a heating temperature range of 45-113°F (5°C-45°C) and comes with a temperature controller that allows you to
- 【2 Modes of Timing Function】the sourdough starter warmer has 2 modes of timing; Mode 1: set the working time according to your needs (0-24 hours); Mode 2: keep working all the
Welcome to the Rabbit Hole
If you've ever stood in a grocery aisle, stared down a $5 bottle of kombucha, and thought, there has got to be a better way, you have landed in exactly the right place. There is a better way. And it costs roughly 40 cents per bottle to make at home once you are set up.
We have been brewing continuous kombucha batches in our test kitchen for the better part of three years, cycling through more than a dozen vessel and heater combinations to settle on what genuinely works for first-timers. The good news? You do not need $750 of fancy equipment to make spectacular booch. You need the right $40 jar, a clean kitchen, and a little patience.
> Key Takeaway: A modest $60 investment in equipment pays for itself in roughly 17 days of home brewing. Every batch after that is essentially free probiotics.
The Problem Most Beginners Hit (And How to Sidestep It Entirely)
Here is the truth nobody tells you: the number-one reason first kombucha batches flop is not contamination. It is temperature.
Our very first batch, brewed in a drafty Vermont kitchen in October at about 66°F, took nineteen agonizing days to reach a drinkable pH, and even then it tasted like sad, weak sweet tea with an attitude problem. The same exact recipe in our heated test setup at 78°F? Ready in eight days flat, crowned with a thick, healthy new SCOBY layer floating on top like a proud little pancake.
> Pro Tip from the Test Kitchen: Yeast and bacteria turn sluggish below 72°F. The longer your brew sits underactive, the higher the risk of mold landing on the pellicle. A simple heating wrap pays for itself in the very first successful batch, and then keeps paying for years.
The second silent killer is vessel choice. People reach for whatever big jar is rattling around the cabinet, often a narrow-neck water jug, and end up with a tiny surface area that suffocates the culture. Your kombucha needs:
- A wide mouth for proper oxygen exchange and a fat, happy SCOBY
- Crystal-clear glass so you can monitor growth without disturbing the brew
- At least 1-gallon capacity to give your culture room to stretch out and breathe
- A flat bottom for even heat distribution from your heating wrap
Watch: Kombucha Brewing Demystified in 10 Minutes
Before we dive into the granular step-by-step, here is a gorgeous visual walkthrough that pairs beautifully with the written guide below. Hit play, take notes, then come right back for the deep dive.

Our Editor-Tested Gear: Recommended Products at a Glance
After shattering three jars, surviving one truly humbling fruit fly invasion, and burning through more SCOBYs than we care to publicly admit, here is what actually earned a permanent spot in our brewing setup.
| Product | Best For | Price | Link |
|---|---|---|---|
| 2 Gallon Glass Fermentation Jar | Primary fermenter | Check price on Amazon | Check Price on Amazon |
| Kombucha Heating Wrap with Digital Thermostat | Year-round temperature control | Check price on Amazon | Check Price on Amazon |
| Organic Loose-Leaf Black Tea (1 lb) | The flavor foundation | See the product list on this page | |
| pH Test Strips (3-Pack) | Knowing when it is ready | See the product list on this page | |
| Flip-Top Bottles (6-Pack) | Second fermentation fizz | See the product list on this page |
The Step-by-Step Brew: Your First Gallon Decoded
Step 1 — Brew the Sweet Tea Base
Boil 4 cups of filtered water. Steep 8 bags of organic black tea (or 2 tablespoons loose leaf) for a full 10 minutes. Stir in 1 cup of plain white sugar until completely dissolved. Yes, white sugar. The yeast eats it; you do not.
Step 2 — Cool It Down (Non-Negotiable)
Top off with 10 cups of cool filtered water and let the entire mixture drop to under 85°F before introducing the SCOBY. Hotter than that, and you murder the culture instantly. We use a kitchen thermometer; you should too.
Step 3 — Introduce the SCOBY and Starter
Pour the cooled sweet tea into your wide-mouth jar. Add 1 cup of mature starter liquid (this is the acidic protective shield), then gently slide in your SCOBY. It may float, sink, or pull a Houdini and sit sideways. All normal.
Step 4 — Cover and Wait
Secure a tight-woven cloth (an old t-shirt cut to size works perfectly) with a rubber band. Place the jar in a dark, undisturbed corner between 75-85°F. Now: walk away.
Step 5 — Taste-Test from Day 7
Use a clean straw to draw a small sip. Too sweet? Give it more time. Vinegary tang with a faint tea sweetness? You have hit the magic window.
> Insider Hack: Start tasting on day 7 and check daily. Every kitchen is different. Trust your tongue over any calendar.
The Second Fermentation: Where the Magic Fizz Lives
This is the step that separates flat homebrew from drinks that genuinely pop, hiss, and dance when you crack the top.
Decant your finished kombucha into flip-top bottles, leaving about an inch of headspace. Add 2 tablespoons of fruit puree, juice, or fresh ginger to each bottle. Cap tightly. Let them sit at room temperature for 2-4 more days.
The yeast feasts on the new sugars, builds carbonation inside the sealed bottle, and rewards you with the most satisfying psssht you have ever heard in your kitchen.
Crowd-Favorite Second Fermentation Flavors
- Ginger-Lemon: A spicy, bright classic that never disappoints
- Strawberry-Basil: Garden in a glass, ridiculously refreshing
- Blueberry-Lavender: Floral, sophisticated, dinner-party worthy
- Mango-Habanero: For the bold; sweet meets slow burn
- Tart Cherry-Vanilla: Tastes like a probiotic dessert
Common Pitfalls (And the Fixes That Actually Work)
| Problem | Likely Cause | The Fix |
|---|---|---|
| Brew tastes flat | Low temperature or weak SCOBY | Heating wrap + fresh starter |
| Fuzzy mold on top | Contamination or temp too low | Discard everything, sanitize, restart |
| Vinegar-bomb tartness | Fermented too long | Shorten to 7-9 days |
| Zero fizz after F2 | Loose bottle seal or cold room | New flip-tops + warmer spot |
| SCOBY sinks forever | Totally normal | Be patient; a new one will form on top |
Frequently Asked Questions
Q: Can I brew with green tea instead? Absolutely. Many veteran brewers prefer a 50/50 blend for a lighter, brighter flavor. Avoid flavored teas with oils (Earl Grey, chai) for primary fermentation, however, as the oils can damage your SCOBY over time.
Q: Is the alcohol content something to worry about? Home-brewed kombucha typically lands between 0.5% and 2% ABV. Most adults will not feel a thing, but it is something to be aware of if you are pregnant, nursing, or sensitive.
The Bottom Line
Home kombucha brewing is one of those rare hobbies that pays you back, in dollars saved, in gut health, in the quiet satisfaction of pulling a beautiful bottle of YOUR creation out of the fridge. The first batch feels intimidating. By batch three, it is muscle memory. By batch ten, you are giving bottles away as gifts and casually mentioning your SCOBY hotel at dinner parties.
Your journey starts with one wide-mouth jar and a single brave SCOBY. Everything else is just delicious practice.
> One Final Nudge: Order the jar. Order the SCOBY. Brew the tea this weekend. Future-you, sipping a perfectly fizzy ginger-lemon kombucha in two weeks, will be very, very glad you did.
Key Takeaways
- Choosing the right how to brew kombucha at home means matching the key features to your specific needs and budget
- Read real customer reviews and check the return policy before you commit
- Also covers: homemade kombucha recipe
- Also covers: first kombucha batch
- Also covers: kombucha brewing steps
- Compare value across models — the priciest option is not always the best fit


