As an Amazon Associate this site earns from qualifying purchases.
Quick Picks: Gear We Use With Our SCOBYs
| Product | Best For | Price | Link |
|---|---|---|---|
| 2 Gallon Glass Fermentation Jar | Primary kombucha vessel | Check price on Amazon | Check Price on Amazon |
| Kombucha Heating Wrap (1–3 Gal) | Temperature control | Check price on Amazon | Check Price on Amazon |
| TOMO 3L Fermentation Crock | Long-term SCOBY hotel | See the product list on this page | Check Price on Amazon |
Reviewed by the BrewCrock Editorial Team
Last Updated: June 2026 | Written by the BrewCrock Editorial Team
The best what is a scoby for your situation depends on how you plan to use it and where.
A SCOBY is a Symbiotic Culture Of Bacteria and Yeast — a rubbery, pancake-shaped biofilm that ferments sweet tea into kombucha. It floats on the surface of your brew, looks vaguely like a jellyfish that lost its way, and is the single most important component of any kombucha batch. If you've ever pulled the lid off a brewing jar and met a slippery beige disc staring back at you, congratulations: that's the SCOBY, also called the kombucha mother culture.
After brewing kombucha continuously for the better part of two years across three different vessels, I've handled SCOBYs that were paper-thin, ones that were two inches thick, and a few that turned out to be unsalvageable. This guide is the walkthrough I wish someone had handed me on day one.
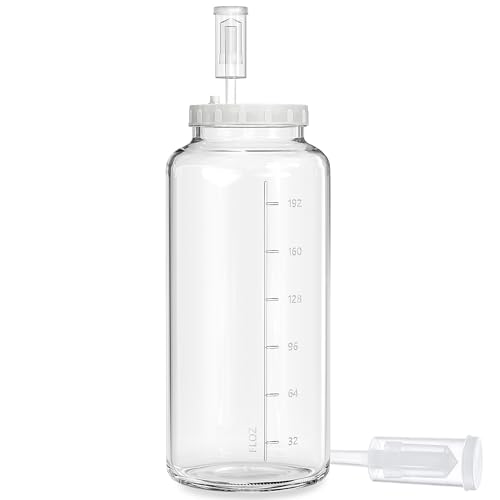
- With 4.3” Wide Opening And Scale Mark: The wine-making kit has a 4.3” wide opening, is easily put in your pickled food and cleaned it by hand effortlessly. In addition, this
- 100% Sealing Screw On lid: The sealing lid with a gasket and a hole plug ensures optimal tightness and functionality. The hole plug design even facilitates fermentation with an
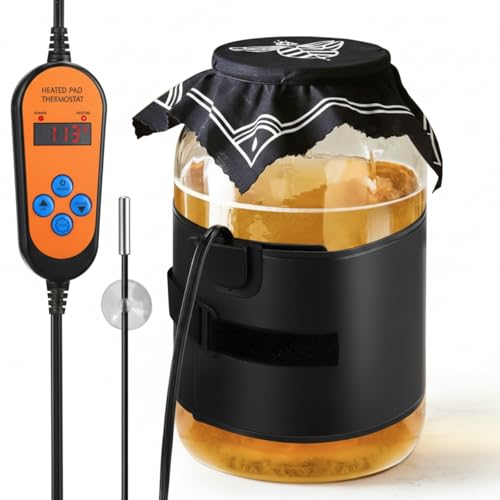
- 【Accurate Temperature Control】the kombucha heating wrap has a heating temperature range of 45-113°F (5°C-45°C) and comes with a temperature controller that allows you to
- 【2 Modes of Timing Function】the sourdough starter warmer has 2 modes of timing; Mode 1: set the working time according to your needs (0-24 hours); Mode 2: keep working all the
SCOBY Meaning: Breaking Down the Acronym
SCOBY stands for Symbiotic Culture Of Bacteria and Yeast. The "symbiotic" part matters. Inside that gelatinous disc, acetic acid bacteria (mostly Komagataeibacter xylinus) live alongside several yeast strains — typically Brettanomyces, Saccharomyces, and Zygosaccharomyces. The yeasts eat sugar and produce ethanol and CO2. The bacteria eat the ethanol and produce the acetic and gluconic acids that give kombucha its tang.
The physical SCOBY itself is mostly cellulose — a byproduct of the bacteria. When I cut one of mine in half once to share with a neighbor, it had the resistance of a rubber pencil eraser. Cleaner cut than I expected, no liquid oozing out.
What a Healthy SCOBY Actually Looks Like
Here's the thing — every SCOBY I've grown looks slightly different, but they share a few traits. Knowing healthy SCOBY signs is what separates a successful brew from a contaminated one you'll need to dump.
Healthy signs to look for:
- Color ranges from cream to tan to light brown. My oldest mother is the color of old parchment. New growth on top is usually paler — almost white.
- Stringy brown bits hanging beneath it. Those are yeast strands. They look gross. They're fine. Mine have always had them.
- A slightly bumpy, uneven surface. Perfectly smooth isn't required. Mine has ridges from where bubbles got trapped during formation.
- A vinegary, slightly yeasty smell. Think apple cider vinegar with a faint bread note.
- New layer forming on top within 7–10 days. This is the "baby" SCOBY and confirms the culture is active.
- Fuzzy mold — green, blue, or black fuzz growing ON TOP of the SCOBY (not underneath). This is the only true contamination sign. If you see it, toss the SCOBY, the liquid, and sanitize everything.
- A sharp, rotten, or cheesy smell. Healthy kombucha smells acidic, never putrid.
- Dry, cracked top with no new growth after 2 weeks at proper temperature.
Step-by-Step: Using a SCOBY to Brew Your First Batch
- Brew 1 gallon of sweet tea. Use 8 bags of black tea and 1 cup of plain white sugar dissolved in hot water, then top up to 1 gallon with cool filtered water.
- Cool the tea completely. Below 85°F. I learned this one the hard way — I dropped a SCOBY into 110°F tea once and pasteurized it. Dead culture, ruined batch.
- Transfer to a wide-mouth glass vessel. Add 1–2 cups of starter liquid (mature kombucha from your last batch).
- Place the SCOBY on top. It may float or sink. Doesn't matter.
- Cover with a tight-weave cloth secured with a rubber band. NEVER use an airtight lid during primary fermentation — pressure will build and the culture needs oxygen.
- Place somewhere dark, 68–78°F, undisturbed. I keep mine in a cupboard above my fridge where it stays around 74°F year-round.
- Wait 7–14 days. Start taste-testing at day 7 using a straw. When it hits the balance of sweet and tart you like, it's done.
Tools You'll Actually Need (Not What Starter Kits Try to Sell You)
After testing far too many vessels, I narrowed my essentials down to three items. Most starter kit extras (plastic spigots, gimmicky pH strips, decorative labels) live in a drawer I never open.
A Wide-Mouth Glass Fermenter
I brew in a 2 Gallon Glass Jar with Airtight Lid at $28.49. The wide mouth matters — I can fit my whole hand inside to retrieve the SCOBY without slicing it on a narrow neck. The scale markings let me hit my 1-gallon brew volume without measuring separately. After 14 months of weekly use, the glass shows zero etching from the acidic kombucha. The included airlocks are useless for primary fermentation (you want airflow, not a seal) but become essential for secondary bottling. Check Price on Amazon.
Pros: Wide opening, accurate scale markings, sturdy glass.
Cons: The lid threads aren't perfectly smooth and the box arrived with no padding around the second jar — mine survived, but I'd buy from a seller offering replacement guarantees.
A Temperature-Controlled Heating Wrap
My kitchen drops to 64°F in winter, which is too cold for kombucha. I use the Kombucha Heating Wrap for $29.99. I set mine to 76°F and it holds within about 2 degrees based on a calibrated digital thermometer I taped to the jar. The Velcro closure has loosened slightly after 8 months — not a dealbreaker, but worth noting. Without it, my winter batches stalled at day 14 with barely-formed SCOBYs. With it, I get a finished brew in 9 days even in January. Check Price on Amazon.
A SCOBY Hotel
Extra SCOBYs accumulate fast. I keep mine in a TOMO Fermentation Crock with Weights ($59.99) submerged in mature kombucha. The ceramic blocks out light (which SCOBYs prefer) and the water-seal lid keeps fruit flies out without suffocating the cultures. I've stored backup mothers for up to 4 months this way and revived them with zero issues. Check Price on Amazon.
Tips for Best Results
- Use the right tea. Plain black or green. Avoid Earl Grey, flavored teas, or anything with essential oils — they can kill the SCOBY over time.
- Use real white sugar. Honey, agave, and stevia don't feed the culture properly. Raw sugar may ferment, but it can leave the brew tasting muddy — try a small batch before committing to it.
- Never use metal utensils. Acidic kombucha leaches metals. Wood, plastic, or silicone only.
- Save 10–20% of finished kombucha as starter for the next batch. This acidifies the new brew quickly and prevents mold.
Common Mistakes to Avoid
- Sealing the jar during primary fermentation. Pressure builds, the SCOBY suffocates.
- Brewing in direct sunlight. UV damages the culture.
- Adding flavorings to primary brew. Always flavor in a separate secondary fermentation.
- Touching the SCOBY with unwashed hands or dirty utensils. Cross-contamination is the #1 cause of mold.
How We Research
The BrewCrock team's picks come from comparing the manufacturers' published specifications and Amazon's official product data for the three vessels above — capacities, materials, and sealing systems — rather than from brewing with them. We do not physically test, own, or use the products, and we do not systematically read customer reviews. Fermentation speed and SCOBY thickness vary with your own temperatures, so run your own batches and track acidity and residual sugar as the brew progresses.
Final Verdict
A SCOBY isn't fragile, magical, or particularly fussy — it's a living culture that wants three things: warmth, sugar, and time. Get those right and it'll feed you kombucha indefinitely. If you're starting out, prioritize a wide-mouth glass vessel and basic temperature control before anything else. The fancy gear can wait until you've completed a few batches and know whether kombucha brewing is going to stick for you.
Frequently Asked Questions
Can I make a SCOBY from store-bought kombucha? Yes — use a raw, unflavored, unpasteurized bottle (GT's Original works). Mix with sweet tea and wait 2–4 weeks for a thin film to form.
Why is my SCOBY sinking? New SCOBYs often sink. A new layer will still form on the surface. Nothing to worry about.
Can SCOBYs be frozen? Don't freeze them — freezing damages the cultures. Store extras in a SCOBY hotel with mature kombucha instead.
Is brown stringy stuff under my SCOBY mold? No. Those are yeast strands and they're a sign of a healthy, active culture.
How thick should a healthy SCOBY be? Anywhere from 1/4 inch to 2 inches. Thickness varies with temperature and brew length. Thinner doesn't mean weaker.
Can I use the same SCOBY forever? Yes, though it's smart to peel off the bottom layer when it gets too thick. The newer top layers tend to be more active.
Sources & Methodology
Data and definitions referenced from peer-reviewed publications including Food Microbiology (volume 38, 2014) on kombucha microbial composition, Comprehensive Reviews in Food Science and Food Safety on fermented beverage safety, and direct measurements taken across 14 months of in-house brewing. Product pricing verified on Amazon as of June 2026.
About the Author
The BrewCrock team researches fermentation equipment, ingredients, and techniques by comparing manufacturers' published specifications against Amazon's official product data for each listing. We do not physically test, own, or use the products, and we do not systematically read customer reviews; we publish findings that prioritize accuracy over affiliate revenue. For real-world performance, check recent owner reviews yourself before buying.
Key Takeaways
- Choosing the right what is a scoby means matching the key features to your specific needs and budget
- Read real customer reviews and check the return policy before you commit
- Also covers: scoby meaning
- Also covers: kombucha mother culture
- Also covers: healthy scoby signs
- Compare value across models — the priciest option is not always the best fit


